Apple Butter Apple Galette – A Rustic Fall Dessert

If you’ve been here since the summer months, then you will know that this is not the first galette in this challenge. A few months ago we made a Savory Zucchini Galette using garden fresh veggies and it was a delight!
Jump to RecipeI think one of the reasons I love a galette so much is because it is a simpler way to make pie! You don’t have to worry abut shaping crust and making lattice or intricate designs, the look is simple and rustic. No pie birds needed because it is so shallow. No need to pre-bake a crust. I highly recommend adding this to your holiday baking list.
You have to admit that apples are THE go-to fruit of the season, and who doesn’t love apple butter?!?!?
You can make your own apple butter, or use store bought, which is exactly what I did. If you are in the St. Louis metro area, then you know the name Eckerts. They have such great apple cider and apple butter, that is what I used for this recipe. Work smarter, not harder!
Apple choice can make a difference. I wasn’t thrilled with the Granny Smith apples I used for something a while back, too tart. I used Galas for this and it was the perfect choice! The extra sweetness with the tart tang of the lemon juice was absolute perfection. Peeling and slicing those apples went quickly with my KitchenAid attachment. I know KA attachments are quite the financial investment, but we have had this one since 2017 and it has been worth its weight in gold. As a matter of fact, only two of my KA attachments stay in the kitchen, this one and the sifter/scale attachment. I use all of my attachments, but those are the two I lean on heavily, so they stay close by. The rest get stored on a shelf in the basement.
No, the recipe does say to add cubed butter to the top of the galette before baking. I skipped this step and suffered no issues for it. I feel like the heavy butter in the crust more than made up for it and anything more would have been overkill. I also drizzled apple butter over the top and that was, in my opinion, a good decision as well. Go with your gut!
Ingredients
- CRUST
1 cup (113g) wheat flour
1/2 cup (60g) all purpose flour
1 1/2 teaspoons granulated sugar
3/4 teaspoon table salt
12 tablespoons (170g) unsalted butter, cold; cut into 1/2″ cubes
6 tablespoons (85g) sour cream
- Apples
5 1/2 cups (622g) apples, peeled and sliced about 1/8″ thick (roughly 3 medium apples)
1 tablespoon dark brown sugar or light brown sugar, packed
juice of 1/2 lemon (about 1 tablespoon)
- MISC
3/4 cup apple butter
egg wash (1 egg + 1 tbsp water, beaten)
Coarse sugar for sprinkling
Directions
- To make the crust: In a large bowl, whisk together the flours, sugar, and salt. Add the butter to the bowl, then use your hands to separate the cubes and coat each one in flour. Flatten the cubes between your thumbs and forefingers. Continue to pinch the pieces and toss them in the flour until you’ve broken down the butter into pieces that range in size from lentils to almonds.
- Add the sour cream and use a fork to evenly distribute it into the flour mixture. Stir until large clumps of dough begin to form, then use your hands to gently knead and squeeze the dough together until you have a cohesive mass with only some dry bits remaining on the bottom of the bowl.
- Transfer the dough to a sheet of plastic wrap or reusable wrap and transfer any dry bits from the bowl to the top of the dough, pressing to incorporate them. Wrap the dough and use the plastic wrap/reusable wrapper to form the dough into a smooth, crack-free disk about 2″ thick. Roll the disk on its edges to smooth out the sides; this will make it easier to roll your dough into a circle later. Transfer the dough to the refrigerator until firm, at least 90 minutes and up to 48 hours. While the dough chills, make the apple butter if desired.
- To make the apple filling: In a large bowl, toss the sliced apples with the brown sugar, lemon juice, and salt.
- Preheat the oven to 425°F with a rack in the middle.
- To assemble the galette: Unwrap the chilled dough and place it on a piece of floured parchment, then let it soften for 5 to 10 minutes at room temperature.
- Sprinkle the top of the dough lightly with flour. Use a rolling pin to bang your disk into an even round about 1″ thick. Rotate and flip your dough as you work, and roll the dough into a 12″ to 13″ circle about 1/8″ thick. Add more flour as needed to prevent the dough from sticking. If your dough begins to crack or feels dry, lightly spritz or flick it with cold water. If your dough becomes delicate and warm at any point, transfer it to the refrigerator for about 5 to 10 minutes to firm up before continuing to roll.
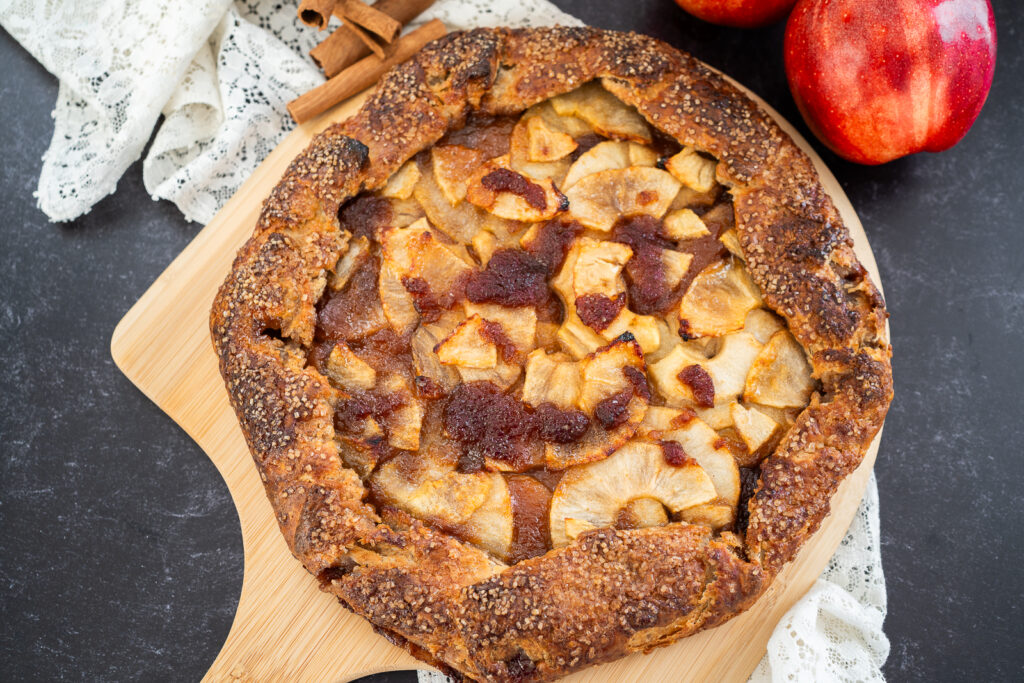
- Once the dough is fully rolled out, spread the apple butter in a thin, even layer over the dough, leaving a small 1/2″ bare border around the edges.
- Starting about 2 1/2″ to 3″ in from the edge of the dough, shingle the apple slices in 2 or 3 concentric circles, working from the outside toward the center. (Discard any excess lemon juice left in the bowl.)
- Use kitchen scissors or a sharp knife to cut slits from the edge of the dough to the start of the apple slices, in 3″ to 4″ intervals around the circumference of the galette. Fold the flaps towards the center of the galette; they’ll overlap to create a decorative border. Press lightly to seal.
- Slide the parchment and galette onto a baking sheet, then chill in the refrigerator or freezer while the oven preheats (at least 15 minutes).
- When ready to bake, distribute the cubes of butter over the apples. Brush the crust generously with the egg wash, then sprinkle the tart all over with coarse sparkling sugar.
- Bake the galette for 35 to 40 minutes, until the crust is deep brown and the apples are tender.
- Let cool on the baking sheet, then use the parchment to transfer it to a cutting board to slice.
- Storage information: Store the apple galette, well wrapped, at room temperature for 2 days, or in the refrigerator for 5 days. Reheat, wrapped in foil, in a warm oven.


